
There are few companies left that can work smoothly without email. This form of communication is so integrated in our professional lives that it’s taken for granted. When you’re going to check your inbox less frequently for a few days, it’s quite handy and polite to let people know that with an automatic reply. Such a message is (fairly) commonly known as an Out Of Office or OOO for short.
The device used for this manual is set in Dutch. The text has been automatically translated. The exact name of settings may differ on your device.
Ideally, less access to your mailbox means you’re on leave and enjoying a refreshing vacation. Unfortunately, it could also mean you’re sick and even reading emails makes your sore throat worse. Another possibility is that you’re on a work trip, possibly abroad. In that case, you might be too busy networking or paying close attention to the explanations during a factory visit.
Whatever the reason for your absence may be, let the people who email you during that period know with an automatic out of office message. Many people don’t know that you won’t be glued to your computer or phone for a while. Such a message is quickly set up, but sometimes it’s worth putting some thought into composing it. We’ll tell you here how and what to do if you want to set this up in Microsoft Outlook.
Out of Office in Outlook
First, we’ll look at the desktop app, for the simple reason that it’s the preferred version in our editorial office. Then we’ll also cover the web version and the mobile app. Let’s start with the old, familiar Office app for Windows, still the preferred version for many. The procedure is as follows:
-
Step 1 – Open Outlook
Before you can tell everyone that you won’t be checking your mailbox much or at all for a while, you need to open it first. On desktop, you simply click the Outlook icon in the taskbar. If it’s not there? Then go to Start and click Outlook there. We’re fans of the taskbar if you use the app daily.
-
Step 2 – Go to the Right Page
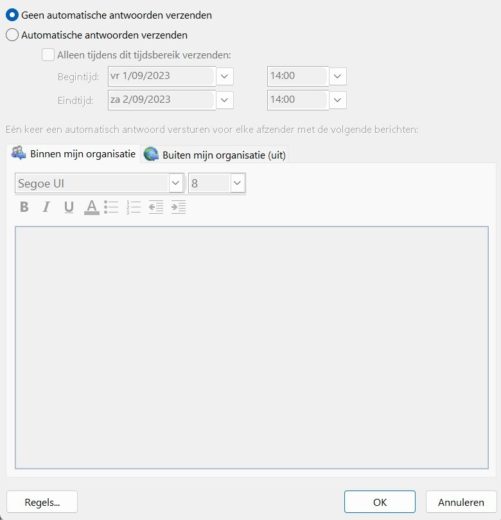
In desktop, click on File in the top left, then on ‘Automatic Replies’. You’ll immediately see a box where you can fill in almost everything. Check ‘Send automatic replies’ and you’re ready to create your message.
-
Step 3 – Set Up and Configure
First, indicate that your message should only be sent during a specific period and enter a start and end date, and do the same for the time.
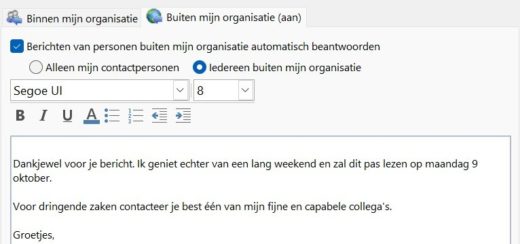
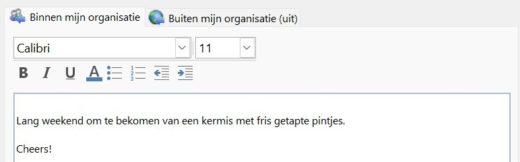
Then comes the fun part, the actual text. Here you can make a distinction between one for people inside or outside your organization. The former can perhaps be a bit more casual, depending on the atmosphere within your company. That’s also a factor for the latter, but it’s usually going to be a bit more formal. For outside your company, you can make a further distinction between just your contacts and everyone outside your organization. We recommend checking the latter, you never know who might email you when you can’t respond immediately.
Read everything over carefully one more time and click ok. Your message is now ready for the desired days. Click on the arrow in the top left and you’re back in your inbox.
Now that Microsoft is pushing the new version of the Outlook app (although you can still hold off on the transition for a while), it’s useful to also look at how to set up the out of office in the new version. Everything looks a bit different in the new Outlook compared to the old version.
-
Step 1 – Go to the right page
After reading the previous guide, you now know how to open Outlook. That’s one of the few things the new version hasn’t changed. Click on the gear icon in the top right of the toolbar to open settings and look under Accounts for Automatic replies.
-
Step 2 – Set up and configure
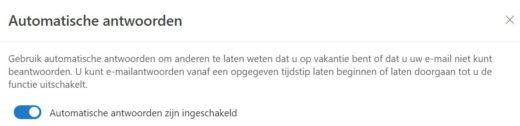
Now move the slider to the right to send automatic replies. First, you need to determine the period of your absence. Set the start and end time, and then choose whether you want to send it to contacts within or outside your organization. Now type a message that Outlook should send to those who email you during your absence, like the example below.

-
Step 3 – Clear Your Calendar
The new Outlook app has another handy feature. With the automatic reply function, you can clear your calendar for the period of your absence. Check Block time in my calendar and give the event a name. Then you can set Outlook to remove all pre-scheduled appointments, for example that weekly team meeting, from your calendar and politely decline the invitation on your behalf when someone tries to schedule a new appointment.
Small caveat for those who use the Microsoft Bookings tool to make appointments: if you mark a full day as absent, Bookings doesn’t automatically adopt this.

Web and Mobile
We’ll now briefly go over the two other options. A large part of it works roughly the same as the desktop app, so this will be less extensive.
-
Step 1 – Open Outlook
For the web version, go to the site, click on Sign In and enter your email address and password. Many people probably have it in their favorites and just need to click on it there.
If you want to know the method via the mobile app, we assume you’ve already downloaded it. So activate it on your phone or tablet. If that’s not the case, you know what to do.
-
Step 2 – Go to the Right Page
Both in the web version and in the mobile app, you need to go via Settings (the familiar gear icon). In the mobile app, you’ll first need to click on your profile picture.
Then go to the ‘Email’ section (web) or choose your email account (mobile) and slide the button for ‘Automatic Replies’. In the mobile app, you can already choose here who will see your automatic reply.
-
Step 3 – Set Up and Configure
Then it’s almost the same as via the desktop app, just in a slightly adjusted layout. You indicate the start and end date and do the same for the time. Then you compose the text(s) and check the options for your calendar.
Closing is simple: in the web version, just click X and save, in the mobile app you exit the screen and the system asks you to confirm.
-
Extra Step 4 – Disable
Is your vacation not happening (too bad) or have you recovered (hooray) and is the out of office no longer needed? Then it’s very easy to turn it off again. We’ll list the three versions:
- Desktop app: at the top of the screen where you filled in everything, you can indicate ‘Do not send automatic replies’ and the function will be disabled
- Web version: slide the button at the top back to the left and click Save at the bottom
- Mobile app: move the slider in the window where you filled in everything back to the left and confirm by clicking on the arrow or the V icon
How to Write an Out of Office?
The texts we used as examples are of course just that, examples. Depending on what you prefer, you can set a formal message or a very casual one. Maybe a joke, if that fits your style and that of your company. You can adjust the message for contacts within and outside the organization, in case it can be more informal for colleagues than for your business relations.
There are some ‘generally accepted’ agreements about what an out of office message should contain:
- The period of your absence;
- The date when you’ll be back or expect to be back;
- The reason for your absence, although you certainly don’t need to go into detail;
- Which colleague is reachable for urgent questions (and their contact details).
In case you don’t mind being ‘disturbed’, you might consider adding your (work) phone number to your message, for example for urgent matters. However, this is a decision you have to make yourself, if you don’t mind a client calling you while you’re sunbathing on the beach. It’s just an extra option we don’t want to withhold from you. If you really don’t want to be disturbed and won’t be opening your mailbox for the entire vacation period, that’s your full right, but then make it clear in a friendly manner that the recipient shouldn’t expect a response.
Sneaky Extra Tip
When you’re absent for more than a few days, an inbox can quickly become quite full. For some people, it doesn’t even take that long. If you have the freedom, you can set an extra day for your out of office when selecting the end date. This gives you a bit more breathing room on your first day back to process all the emails waiting for you. But only do this if you have that option and it doesn’t rub any colleagues the wrong way.

This how-to originally appeared on December 8, 2023, and was updated on April 2, 2025.